This article is Part 4 in a 4-Part Series.
- Part 1 - Refactoring to Data Driven Tests
- Part 2 - How to get data for Data-Driven Tests?
- Part 3 - Tips, tricks, and good practices for Data-Driven Testing. Part 1.
- Part 4 - This Article
This post is a continuation of a previous tips, tricks, and good practices for Data-Driven Testing entry. This one with more code.
Before we begin
I will be converting this series into an ebook with additional source code and examples. If you want to get it, please subscribe:
1. Reading data files
1.1 Use SetName
We know that the objects returned by the function that TestCaseDataAttribute points to will generate tests. The question is, how will they be called? By default, the name is generated from the method name and the arguments provided. It won’t be pretty. But we already have descriptive names for the test case folders. Why not use them? This is where the SetName method on the TestCaseData class comes in. We can change the initial file reading code to something better:
    public static TestCaseData[] GetData()
    {
        var retArray = Directory.GetDirectories("MyTestDataFolder", "*", SearchOption.AllDirectories)
            .OrderBy(a => a)
            .Select(a =>
            {
                var ret = new TestCaseData(JsonConvert.DeserializeObject("testdata.json"));
                ret.ExpectedResult = JsonConvert.DeserializeObject("expectedResult.json");
                ret.SetName(a.Replace("_"," ")); //to make it even more human readable I remove the underscores and replace them with spaces.
                return ret;
            })
            .ToArray();
        return retArray;
    }
This isn’t a huge change, but it saves a lot of time in resizing the test results window to check which file failed.
1.2 Wrap file parsing in a try/catch
Your files will have errors, and parsing them will fail. It might not seem like a problem, but it is a bit of a pain. Why? Exceptions thrown in the TestCaseData generating method don’t show in the test results. What happens is that the tests disappear and only the primary method (which is always the parent of all data generated tests) is marked as failed, or inconclusive. Debugging such problems is also not ideal because if Break on all exceptions isn’t enabled, the exception will get caught by the test runner. Exiting our debug session. My solution to this is to wrap the folder reader in a try/catch block and add the crashed file name there. After the change, our code will look like below:
    public static TestCaseData[] GetData()
    {
        var retArray = Directory.GetDirectories("MyTestDataFolder", "*", SearchOption.AllDirectories)
            .OrderBy(a => a)
            .Select(a =>
            {
                try
                {
                    var ret = new TestCaseData(JsonConvert.DeserializeObject("testdata.json"));
                    ret.ExpectedResult = JsonConvert.DeserializeObject("expectedResult.json");
                    ret.SetName(a.Replace("_", " ")); //to make it even more human readable I remove the underscores and replace them with spaces.
                    return ret;
                }
                catch (Exception ex)
                {
                    throw new Exception($"Error in processing test data for folder: '{a}'", ex);
                }
            })
            .ToArray();
        return retArray;
    }
This again isn’t a huge change, but one that when added at the start will save a few hours in pointless debugging.
1.3 Have a file reader class
This tip is one that will save you from reimplementing the reading logic. Extract the logic of reading the dataset files into a separate reader class (I name it DATA_SET_NAMEReader) and place in the same folder as the dataset folder. It will look like this:
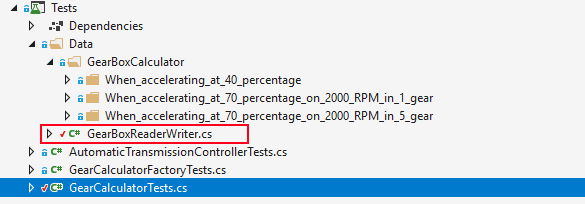
This simplifies the where is that reader question, lowering the effort, and by that making the reuse more probable.
2 Comparing
2.1 Don’t use ExpectedResult for complex objects.
If you read the previous entry, you know that I like using this property. But, as always in IT. It depends. It is handy for simple objects, but for comparing complex ones, I prefer to write my own Asserts.
The other option in NUnit is to use the
Returnsmethod on theTestCaseDataclass. It has the benefits that it returns aTestCaseDataclass so that we can have tidy fluent calls.
    public static TestCaseData[] GetData()
    {
        var retArray = Directory.GetDirectories("MyTestDataFolder", "*", SearchOption.AllDirectories)
            .OrderBy(a => a)
            .Select(a =>
            {
                try
                {
                    //a bit more compacted and fluent.
                    return new TestCaseData(JsonConvert.DeserializeObject("testdata.json"))
                        .Returns(JsonConvert.DeserializeObject("expectedResult.json"))
                        .SetName(a.Replace("_", " "))
                        ;
                }
                catch (Exception ex)
                {
                    throw new Exception($"Error in processing test data for folder: '{a}'", ex);
                }
            })
            .ToArray();
        return retArray;
    }
2.2 Use a diff tool for comparing
Asserts are great. But when running a large number of tests, there are better ways to compare what we expected with what we got - Diff comparison tools. First, how to save the received results as files and what practices I use:
    public class MyTestSiute
    {
        private string _pathForReceived = @"C:\temp\MyDataDrivenTests_ReceivedResults";
        private bool _saveReceivedResultsToDrive = false; //A single flag that determins if we write the restults to the disk

        [NUnit.Framework.OneTimeSetUp]
        public void TestSuiteSetup()
        {
            // A common source of mistakes is comparing old files. This is why I always delete the whole folder
            if (_saveReceivedResultsToDrive && System.IO.Directory.Exists(_pathForReceived))
                Directory.Delete(_pathForReceived, true);
            Directory.CreateDirectory(_pathForReceived); // And recreate it.
        }

        /*
        Get data method and other helper functions
        */

        [TestCaseSource(nameof(GetData))]
        public void MyDataDrivenTests(MyTestData data)
        {
            /*
            some preparation code
            */
            var received = testObject.TestMethod(data.Data);

            if (_saveReceivedResultsToDrive)
            {
                var receivedFilename = Path.Combine(_pathForReceived, data.TestCaseFolderName, "expected.json"); // We want to have the same folder structure and names in the results and in the received folder
                File.WriteAllText(receivedFilename, JsonConvert.SerializeObject(received,Formatting.Indented)); // Remember about the formating!
            }
        }
    }
}
Once this is in place, we can use Code Compare and its option to compare folders to get this result (blue files are those that differ):
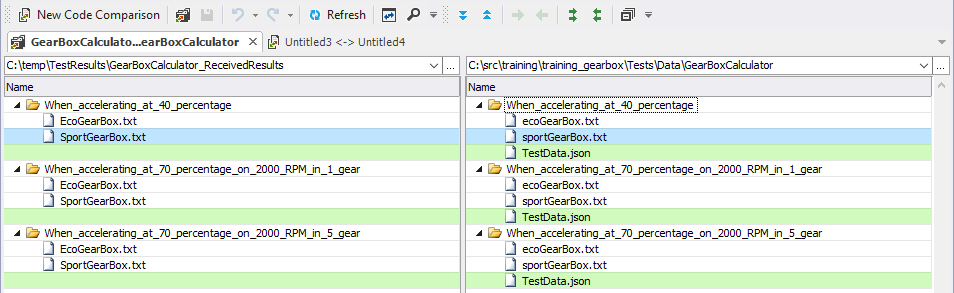
Easy and readable.
Code Compare by default launches in file comparison mode. Switching to directory comparison isn’t that visible, so to save you some time here it is:

3. Advanced testsing scenarios
3.1 One data set, multiple results
In the first post of this series I wrote about testing a gearbox controller. We already had a test case source, so why move to files? When we move the test data to files, we open new options on reusability. What will happen when we want to test a second gearbox controller? We could reuse the same datasets. What to do with the expected result files? Save them in the same folder structure, but use a convention for recognizing for which scenario they are for:
3.2 Multi step testing
Data-driven tests are great not only to verify a single function. Their biggest strength is in verifying the whole process. I wrote previously about how I use data-driven tests extensively in cookit for verifying recipe text parsing. This process is split into multiple data-driven tests:
- Determine if HTML is a recipe page.
- Extract recipe text, ingredient list, image, etc.
- Recognize ingredients.
- Build a list of ingredients, with weights, need for the recipe.
- Extract cooking time, tags, etc.
All of this can be done in one run. But splitting them makes it easier to understand what precisely broke. Data driven tests are especially easy to break down into more detaild tests because all we have to do is to save some intermediary result to the drive, and use it to feed the next step. No need to create additional test data. We already have it.
4 General
4.1 Copy localon all files in Visual Studio/MSBuild
Before I explain it more let me say that I have mixed feelings with this one. I will explain why, after explaining the problem and the solution.
The problem
By default, MSBuild copies only the dll files into the bin folder. That is a good thing since we don’t want to ship source code with our dll files. But with data-driven tests, this is an annoyance because then our data files aren’t on the same level as the test dlls. This is a problem for two reasons:
- Tests are executed with the root folder equal to the test dll root folder. So we will need to traverse to the data folders with
..\..\. Not too elegant and prone to errors. - To speed up the CI pipeline, I often split building and running tests. This way, I can build once and use the build artifacts to run the tests in parallel on multiple agents. Getting the verification faster. The problem is that most build agents only copy the content of the
bindirectory into the build artifacts.
Both of the above can be changed, but are annoying at first. A much smoother solution would be to copy the data directory into the bin folder path.
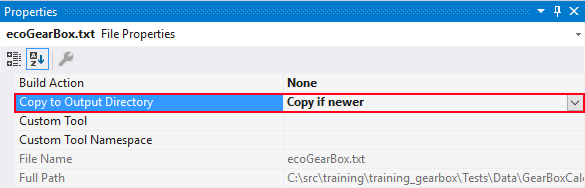
The Solution (?)
To copy our data files into the bin folder, we can change the property of each file to Copy if never.
But this approach is wrong because:
- we have to set it on each file
- when we add a new test data, it won’t be picked up if we don’t set the copy local.
- pointing to each file will create a big
.csprojfile, so merging and conflicts will be harder. - there is a much better solution.
We can set the in the *.csproj to copy the whole folder with a simple change:
  <ItemGroup>
    <None Update="Data\**">
      <CopyToOutputDirectory>PreserveNewest</CopyToOutputDirectory>
    </None>
  </ItemGroup>
This will copy the whole Data folder into the output only if there is a newer version of the file. Awesome!? Not exactly. This solution has one major flaw.
Why I have doubts about this solution?
The biggest problem with this solution is that it will slow down the build (we are adding file copy for each build). Will it be a significant slowdown? For a small number of files and a computer using SSD drives, it probably won’t be noticable. For a large number of files or a machine running a mechanical drive, it can be a disadvantage to consider.
Conclusion
Are those groundbreaking tips? No. But adopting each one of them will make your life easier with data-driven tests.